Saturday, 28 March 2015
PapayaGold Paw Paw moisturising balm
When it comes to annoying skin-related issues, the post-cold dry nose/upper lip is right up there for me. My skin is pretty dry naturally, so when you add in a week worth of nose blowing, the skin around my nose and upper lip literally just cannot cope. It gets sore, it goes red, and man alive does the skin flake off. I often then pick at the skin (classy) which makes it even more sore, and sometimes even bleed (attractive).
Then what follows are several weeks of exfoliating with dry flannels, and slapping on a load of face moisturiser. And bad nose foundation, literally for ages. Flaky, nasty, dry foundation around my nose. Because lets be honest, no foundation deals well with dry flakiness, whatever they may claim.
However recently, I came across (was recommended) something which helped me in my battle against the post-cold nose syndrome. I was at a Christmas meal, and was slapping some Vaseline on my sore little schnozzle, and my friend's girlfriend was like "woah woah woah, don't use Vaseline, are you crazy!?" (OK slight exaggeration, but her reaction did make me feel a bit like I'd sat there wiping engine oil on my nose) She then chucked me a little red tube of Paw Paw moisturising balm and told me to try that instead. Slightly shamed by her reaction to my tin of Vaseline, I promptly went into Boots the next day and purchased a tube of Paw Paw.
I'd seen Lucas' Paw Paw ointment before, advertised as the "go to" product for celebs such as Miranda Kerr, but when I'd seen it was the same consistency as Vaseline, I just assumed it was a posh (and pricier) Vaseline. So not worth it.
I can safely say I was wrong. Although the Paw Paw balm is extremely similar in consistency to Vaseline, I'd say it is ever so slightly lighter in consistency. It feels less like something you'd use to grease a squeaky door hinge, and more like something designed for your skin (no offence Vaseline).
And it works. Slapping some of this on my nose and lips definitely killed off the post-cold effects so much faster than anything else I've used. When I now have colds, I do find myself putting it on during the day at work (much to the intrigue of my colleague, who pointed out she normally only does this kind of thing in the privacy of her own home) but it's so good both as a preventative measure and a treatment. My nose was definitely so much less flaky after using it.
I've also found other uses for it. I get patches of dry scaly eczema on my hands and fingers, which are so frustrating but flare up all the time from washing up / washing my hands during the day. I don't like to use steroid cream too much, so started putting the Paw Paw on. I was so impressed with the result. It doesn't clear them up as fast as the steroid cream (obviously) but because it's so moisturising and it sticks to the skin, it did such a good job of keeping the patches at bay. I also now squeeze some on my hand with my regular hand cream, to give my usual hand cream a bit more gusto.
The tube I bought was the PapayaGold version and was £5.99 for 25g, which isn't as cheap as Vaseline, but then in my head I figure the Vaseline simply doesn't work so it's wasted money anyway. Plus the tube has lasted me much longer than I thought it would. I also prefer the squeezy tube to Vaseline's tin. The tube hasn't got messy at all, and am I the only one who finds the lids of Vaseline tins SO hard to get off!? I'm now running out of my PapayaGold, and have just bought some of the Lucas PawPaw ointment online to see how that compares (I'll keep you posted). But either way, if you suffer from dry skin patches or if the post-cold nose/lip happens to you, then I'd say it's worth carrying one of these around in your bag. It's a little god send in my opinion.
Saturday, 3 January 2015
The Beauty Blender
So there were a few beauty items that I bought last year which I've been holding back from blogging about, mainly because after using them for some time, I've got a serious case of "sitting on the fence" syndrome.
All of the products are much-hyped in the beauty world, rather expensive, and are items which I spent literally ages trying to decide whether to buy or not. I researched them to within an inch of their lives and then ended up taking the plunge when I was feeling a bit down or a bit frivolous.
The first of these is the Beauty Blender, an innovative new way of applying your foundation which is supposed to give flawless, unrivalled coverage.
I blame American Youtubers for this purchase, because I swear there was a time when every. single. one. of them used one of these babies. And the results were undeniably flawless. I'm always intrigued by new methods of foundation application, because my own "application methods" have evolved throughout the years and always for the better. From the wedge shaped sponge (every teenager's go to method) to the round sponge, to the paintbrush style foundation brush, to the Real Techniques bulb-ended Expert Face Brush and crashing into 2014 with the bloody amazing wide-topped Zoeva buffer brush. I've always felt I've upgraded my method, so when this completely new concept popped onto my radar, it was a no-brainer to give it a go. My next successful evolution could be just around the corner!
So a quick 4-1-1 on the Beauty Blender. It's a small, egg shaped, bright pink sponge, which you're supposed to squeeze in water before using. When you squeeze it in (or under) water, it grows. Kind of like those random flannels you get that start off the size of a tealight and then you chuck it under water and it grows into a flannel. Except maybe not on the same scale... Anyway. Once it is wet and "fully grown" you're supposed to towel it off and you are left with a damp, bouncy, slightly larger egg-shaped bright pink sponge.
OK, so the photo above doesn't really give you any idea of the size change as I didn't either a) compare it to the dry version or b) give a size reference. But oh well..there it is. All saturated in water. And bright pink.
The wider end of the "egg" is meant for applying foundation over your whole face, whereas the tapered end is for more precise application around your nose, your chin and also for concealer.
First things first, this application method does give you coverage, and plenty of it. When I used this with any of my foundations, it always up'd the coverage compared to what I was used to with a brush. It's also supposed to make you use less foundation as the sponge is already wet so it doesn't absorb any liquid. I'm not sure I noticed a massive difference in the amount of foundation I was using, but it may have been because I was going in a bit heavy handed.
If I'm honest, I didn't find this the most natural and easy product to use - it certainly took quite a bit of practice and I'm still not 100% convinced by it. You have to tap or sort-of bounce the beauty blender on to your face to apply the foundation, but for some reason it just didn't feel quite right. I felt like I wasn't using it properly, or that I just wanted to give the foundation a good old buff. I found myself doing some random half tap-half buff type action which probably isn't the technique the creators intended. If they'd have seen me using it, they might have cried a little bit.
The end result was that I felt the foundation was sat on my skin a bit, and it felt quite mask-like. I also found that the dampness of the sponge actually dried my skin out. I have the kind of skin that feels very tight after being in contact with water. Give me 5 minutes after a shower, and if I haven't moisturised then I'll have shrivelled up like a prune. I got a similar effect with the Beauty Blender, where I could feel as the "dampness" evaporated or was absorbed into my skin, or wherever the hell it went. And left behind was quite a thick, dry layer of foundation, which didn't feel particularly comfortable on my skin. Maybe this is one of those products better suited to the oilier skinned girlies out there, but if you suffer with dry skin like myself, I don't think it's the best way of putting your foundation on.
I do keep going back to this little egg sponge, because I am concerned I may be using it too heavy handed, or not trusting the tap-tap-bounce method enough, but when it comes to the success of beauty products with me, I always find the proof is in the continuous use. If I've stopped using it within a few weeks of purchase, then to me, it's a sign it was a complete novelty product. A novelty, or a disappointment, or I've got fed up of not quite getting how to use it. This falls into the latter for me, and safe to say that little eggy is rolling around somewhere in the bottom of my make-up box as we speak. Or someone could have pinched it. I'd literally have no idea.
I think I would use this to apply foundation on areas where I need a bit more help in the coverage department, but I'm not really a fan of it as an entire face application method. I thought I was a bit on the fence with it, but now I've sat down and written this post, I think I'm leaning a bit more towards not enjoying it. I'll probably rediscover it next week and fall hopelessly in love with it, but if I do, I'll be sure to let you know :)
In the meantime, I'd say save your pennies on the Beauty Blender and invest in a Zoeva Buffer brush instead.
Thursday, 1 January 2015
Merry Christmas with Zoeva Rose Golden Luxury Set
So, someone was a lucky lady this Christmas because Santa (aka, my boyfriend) stuck these little beauties under the tree. Let's just take a moment to gaze at their rose golden wonderness.
I have been coveting this brush set for SO long, and on various occasions have been tempted to throw caution to the proverbial wind and make a cheeky (and somewhat expensive) purchase. But so far I've resisted, mainly due to the price (£59.99) and mainly because you are paying a premium for them being rose gold, and I've been desperately trying to curb my spending on unnecessary cosmetics.
But this made them the perfect Christmas present, and it's safe to say I was over the flipping moon when I opened them.
Zoeva brushes have been gathering steam in the cosmetics world over the past year, and are starting to make a real name for themselves as brushes that come with a reasonable price tag, but which don't compromise on quality.
Take this set as an example. It contains 8 brushes all finished in black and rose gold, and they arrive in a rather gorgeous leather make-up bag (which is big enough to be genuinely useful). So that works out on average at £7.50 per brush with a free bag thrown in for good measure. Not bad. Not bad at all. Go in to your local drugstore and I defy you to find a decent blusher brush for under a tenner, and that's not even taking into account how goddamn pretty these are.
And with Zoeva, it's all about the little touches. No.1 the make up bag. No. 2 the fact each brush is wrapped in plastic and with a separate, custom shaped plastic "hood" fitted over the bristle end of the brush. If you buy them individually then they come wrapped in the plastic and zipped up in individual bags. You feel like you are buying brushes that are so much more high end than the price you paid.
And as a self confessed cosmetic and beauty addict, these brushes literally speak to me. Zoeva seem to get that, for me, doing my make-up is an experience I really enjoy (sad, I know). And I love a make-up product that I can proudly display on my dressing table (OK I don't have a dressing table, but you get the idea) and these brushes are exactly that. Even my boyfriend agreed they looked "nice" and trust me, nice means he is impressed. And he's a boy. And they're make-up brushes. Am I making my point...?
OK so let's break these down to the individual brushes....
106 Powder
The first and biggest brush in the set is the 106 Powder brush. It has a large rounded-off head of ultra soft bristles, which are packed loose enough to allow the flexibility needed for a good powder brush. You need to be able to "sweep" the powder across your face, and this gives good sweep. I've been in the market for a powder brush for some time, as I've recently started using the MAC Mineralize Skinfinish powder to set my make-up, and I need a decent brush to apply it with. The head of this brush isn't ridiculously big, but still has enough surface area to cover your face quickly and lightly. I like this, as sometimes powder brushes can be too big and they can lack stability. The head can be really large and floppy and there's just no guts behind them. The 106 brush on the other hand seems to have struck a good balance between flexibility whilst still having enough structure and density to buff the powder into the skin for a seamless finish.
102 Silk Finish
This was the brush I was most excited about in the set, and was the one I have got SO close to buying individually in the past. The bristle head is smaller than the powder brush but the bristles are much more densely packed together - I reckon this is going to be blinding at buffing foundation in. Size-wise, it is similar to the Real Techniques Expert Face brush, but it is so much softer to the touch and has a rounder bulb type head. I think this is going to be really good at buffing liquid foundation into smaller, more precise areas of my face or for cream based blushes or bronzers. I swear by the Zoeva 104 Buffer Brush for applying my foundation, but do find the surface area of it to be a bit too large for certain areas of my face, so I'm thinking the 102 is going to be the answer. It's got the same "feel" to it, but more compact.
127 Luxe Sheer Cheek
This is an absolute dupe for the MAC 168 brush, but in my opinion is so much softer and nicer to the touch. As blusher brushes go, the bristles on this are quite loosely packed and flexible. I think this is why it's called the "sheer" cheek, because I imagine it doesn't pack the product on your face, and I don't think this is for serious buffing. I'm excited for this brush because I'm a bit of a blusher wimp, and go in very carefully with my blush, so this could end up being my best friend. I think it's going to give a very sheer, gentle wash of colour. I'm also keen to use this with my Mary Louminiser highlighting powder as I think the gentle touch of this brush is going to make it perfect for giving that effect where highlighter or blusher has just "touched" certain high points of your face.
110 Face Shape
The 110 Face Shape is a smaller version of the Silk Finish brush. It has the same round, bulb shaped head of bristles which are densely packed to give fierce buffing power. As with all of the brushes, the bristles are still crazy soft to the touch and there's enough flexibility in them to mean the brush will still feel gentle on the face. This looks like the perfect brush for precise contouring, especially down the bridge of the nose. I also think it will be good at applying liquid foundation in the more "crevice-y" parts of your face, so around your nose, across your eyelids and around the chin area.
142 Concealer Buffer
This is one of only two brushes in the set that I already own. I bought this a few months back and reviewed it here. This is a mini version of the Silk Finish, with the same features - the bulb head, the dense bristles, the softness. When I bought and reviewed this originally, I wasn't a fan of it. The brush itself is gorgeous to the touch, but I have very dry skin and just find that my concealer needs that warmth from my finger to blend it in. If I use a brush, the concealer just goes a bit too dry. And this is no reflection on the quality of this brush, it's just it doesn't suit my skin type. Having said that, I've been loving this brush for eyeshadow blending. Because of the density of the bristles, partnered with the softness of the brush, this is perfect for the delicate eye area. It buffs and blends eyeshadows like a dream, especially more stubborn cream-based eyeshadows.
227 Luxe Soft Definer
231 Luxe Petit Crease
There are two eye brushes in the set, the 227 Luxe Soft Definer and the 231 Luxe Petit Crease. I already own the 227 and did a mini review of it here. This brush is a total dupe for the much-loved MAC 217 and I am so pleased to have a second one in my collection. Much like the MAC 217, the Zoeva 227 applies eyeshadow like a dream. It loads the colour on, it blends it well, it covers well, it gets into your creases and crevices. As is the running theme with these brushes, it is super soft and to be honest I don't know why anyone would part with the extra money to buy the MAC version. It does the job just as well.
The 231 has a tapered end and is a more precise brush for application of eyeshadow to the crease of your eyelid. I have mega hooded eyes, so my crease is pretty defined already, but it also means that all of my eye make-up involves some kind of 'crease work', so this brush is going to be a welcome addition to my make-up kit. The bristles are dense enough to give this enough "power" behind the application, but the taper means that power is being pushed into the right area. I have very small eyes as well, and this is the perfect size to fit my eyelid.
317 Wing Liner
So the final brush in the set is the 317 Wing Liner brush. This is such a delicate little brush of super fine bristles which taper to an ultra fine point. I'm quite a fan of a slanted eyeliner brush like this, as I think the shape lends itself well to the application of a winged eye. It's really tricky to find a slanted eyeliner brush which is as fine and precise as this. As my eyes are very small and hooded, I don't have much room for liquid eyeliner so I have to keep it mega tight to my lash line and this brush is perfect for the job. Plus the bristles are once again so soft that I don't get any irritation around my super sensitive eyes. If you're a fan of gel eyeliner then I would totally recommend this brush. Totally.
So the Rose Golden Luxury Set is available direct from Zoeva's website. Bit of a warning....the postage costs are pretty steep on these brushes as they come from Germany. Regardless of whether you're buying one brush or ten, the postage is an eye watering £7.50. So if you can find a friend or sister or mum who wants some brushes too, maybe combine the postage, as it is priiiiicey.
You can get some of the brushes and sets from www.love-makeup.co.uk which carries a more reasonable £3.50 shipping cost to the UK, but you may notice some of the brush prices are a tiny bit more expensive than buying them direct from the Zoeva site. So swings and roundabouts really. Swings and roundabouts and really, really pretty rose gold brushes.
Thursday, 27 November 2014
Benefit Sugarglam Fairies
When it comes to 'higher end high street' brands, I'd say Benefit is my most dabbled, but least loyal. When I say higher-end high street, I mean the ranges of cosmetics that you can easily get in most Boots/Debenhams but which come with their own counter, their own "lady" and a price tag to justify both of these. So your Dior, Estee Lauder, Clarins, Chanel, YSL, Bare Minerals and Benefit.
I've tried a lot of Benefit's products - mainly because I think that whoever developed the concept behind their products was a pure genius. The packaging, the names, the styling of the counters ... it all speaks to me. It begs me to come and play. I also feel they hit the nail on the head with a lot of 'issues' women have with their cosmetics. They promise to shrink pores, give you breathable foundation, cancel out redness, erase undereye circles, give the world the first moisturising concealer. The list goes on.
I do find however that their products are majorly hit and miss when it comes to effectiveness. Amongst others I have tried their "You Rebel" tinted moisturiser, "Some Kind A' Gorgeous" foundation, "Dandelion" blush, "Erase Paste" under eye concealer and "You're Bluffing" yellow concealer, and none of these floated my boat. For their price tag, they were a disappointment. But Benefit do offer some absolute gems, and they are actually easy to identify, mainly because they get so. much. hype.
My 'recommended' Benefit products, honed by years of cosmetics splurging, are:-
1. Hoola bronzer
2. Bad Gal eyeliner
3. Porefessional
In my mind, these are the winners of the bunch, and the only ones worth the price tag (all around £15-£24 each. Yikes).
But because of the price tag, I have to be a bit reserved when buying these. I don't always buy them as soon as they run out and I am ALWAYS looking for cheaper dupes.
My Hoola ran out centuries ago, my porefessional is getting extremely low, and my mascara has all but dried up completely. So when I saw Benefit's Limited Edition Sugarglam Fairies gift set, I genuinely thought the cosmetic gods were speaking to me. Speaking to me from high above, via a Christmas decorated tin of EVERYTHING I love from Benefit.
So, I simply had to share my excitement with you all. If you are looking to give some of Benefit's wonder kid products a whirl, then you have to look into buying this set.
At £44.50 you get a full size Hoola, full size Porefessional, full size "They're Real" mascara and a mini Benetint.
All of these items individually would equal approximately £68, not including the mini Benetint. That's a saving of nearly £25! Plus if you can get it in one of the Christmas deal days where places like Debenhams offer 10% or 20% off, then basically you're laughing.
Hoola
I have talked about Hoola in a couple of bronzer posts (here and here) and you will see that in both of them, I'm using Hoola as my ideal bronzer and then trying to find cheaper dupes. I love this bronzer because it is completely matte and has minimal orange undertones to it, meaning it looks natural but still manages to keep the face warm (rather than grey, like some non-orange bronzers can do). At £23.50, I think it is a bit overpriced for my kind of budget, but there's no denying it is a very easy to use, flattering bronzer and other than Bahama Mama by The Balm, I've struggled to find anything that comes close.
Porefessional
For me, Porefessional is a bit of a random product. Obvious pores are something I struggle with a lot, and I am always trying to find ways to smooth them over. I've tried a number of pore reducing products, such as L'Oreal's Blur Magic and Smashbox primer. I can honestly say that none of them have worked for me. Some just sit in my pores and make them look even more obvious and others just matte my skin off but don't touch the appearance of my pores. Porefessional is basically the best of a bad bunch for me. I really like the consistency as it isn't as waxy as other products, and if you rub it in, it doesn't break up into little waxy bits (like when you try and rub a sticker off something and it breaks up - best way I can describe it!) It certainly doesn't erase my pores completely, but I think it does calm them a bit. It isn't drying, it hasn't given me spots and it does provide a good base for your foundation. But I'm still on the look out for an alternative, it definitely isn't holy grail status for me however a lot of people swear by it.
They're Real mascara
If you're a regular reader of my blog, you are probably reading this bit thinking "what the hell!?" Because a month or so ago, I wrote a pretty scathing review on this mascara (see here). I still stand by the majority of my comments, but I will admit that as the mascara has dried out, it has actually worked a lot better. At this point I have to say two things. Firstly, I am massively intrigued to see how I get on with my second batch. Will it perform as badly as the first one did originally? Secondly, if this hadn't of been in this gift pack, I'm pretty sure I wouldn't have parted with £19.50 to buy one. As in my main review, I still think this is an application thing, and I am interested in giving it another whirl, but if it performs like the last one did then, even with the improvement at the end of it's life, I still think this would be the end of my relationship with They're Real.
Benetint
I've literally never tried this, so haven't got anything to give you. It looks a random product, some kind of gel based liquid blush tint that is applied with what looks like a nail varnish brush? Hmm.
Bad Gal waterproof eyeliner
When buying the gift set online, a cheeky little extra popped in my basket to enable me to get free delivery, and that's Benefit's Bad Gal waterproof eyeliner.
*Please let me reiterate that this doesn't come in the Sugarglam gift set*
I haven't used this eyeliner for a while, and have been pretty faithful to my Mac Smoulder kohl pencil, but recently have found my Mac pencil to give me a serious panda eye after a few hours of wear. My Mac pencil is down to the stub, so I was in the market for a new eyeliner and thought I'd go back to the Benefit one. From what I remember, this eyeliner lives up to its waterproof claims, so is ideal for the waterline. I don't recall being particularly excited by the smudger end, which didn't smudge very evenly, but the liner itself was always strong in pigment and long lasting. Fingers crossed my memory is right!
Sunday, 19 October 2014
Anastasia Dipbrow Pomade Taupe
Sorry I've not been blogging much lately, but I've been kinda busy with some grown up shizzle involving moving house (eek) and, more scarily, moving in with a boy.
So unfortunately my hard earned pennies have been going on furniture and cleaning products and paint and carpets and the world's cutest elephant lamps...so I've had to shelve my cosmetics obsession for a bit to stop me ending up with a seriously empty piggy bank.
But we've been moved in now for a month and I've been paid (yay) so I thought it was only right to start giving my make-up habit a bit of TLC.
The first purchase I made was something I have been um'ing and err'ing about for SO long. It's the Anastasia Dipbrow Pomade and I seriously was in two minds about whether to actually buy it.
My first issue was that I'm not much of a brow girl. At all.
I made my first foray into brows when I overplucked one eyebrow a year or so ago and my Mum lent me her brow pencil so I could do some serious repair work.
Since then I've been a strictly pencil lady, following a somewhat disappointing experience with the Smashbox brow powder (review here). Colour-wise, I swear by the Soap & Glory Archery pencil in Blonde Ambition and the L'Oreal Super Liner Brow Artist in Blonde. The L'Oreal one especially is a bar-gain at £5.49 and is such a good colour for my skin tone and hair colour. I always need a blonde which is cooler toned and a bit ashy, and that pencil is seriously my hero of the brow pencil world. So I wasn't really in the market for a new brow product.
But there are some seeeeriously good reviews out there about the Anastasia Dipbrow Pomade, and I'm a sucker for a holy grail product.
So I bought it for £15.00 + £5 postage from net-a-porter (ouuuuchie to the price). I was stuck on whether to get the "blonde" shade or the "taupe" shade and struggled to find many swatches or photos that reassured me on one or the other. I did see a few mega orange-y looking photos of the "blonde" shade so in the end I plumped (nervously) for "taupe".
And oh. man. I love this.
The "taupe" colour is definitely an ashy toned colour but it's not too grey. In fact it is a really good match for my natural eye brow colour, which I'd say is pretty mousey. I think if you're blonde, it will only work if you already have quite dark eyebrows. I've always had darker eyebrows than my hair colour, even when I had white blonde hair, so this blends in really well. If you have very fair or 'true blonde' eyebrows then it may be too dark for you. It's a very similar type of shade as L'Oreal's Brow Artist in Blonde so if you go and swatch that in a store then you can get a pretty good idea of the shade. The only difference is that the L'Oreal once is a teeny bit warmer/yellowy based whereas the taupe has a more ashy base. I've compared the brow artist and the dipbrow pomade below...
So the shade was a massive relief, because I think one of the biggest giveaways with brows is if the shade just isn't right - too dark, too warm - it can be really tricky. And that's one thing I am ALWAYS trying to avoid - obvious brows. I don't really want to look like I do anything to my brows. I'm not looking for a 'made-up' look, I'm definitely going for more au naturel.
And this made me nervous about the dipbrow because a lot of the youtube tutorials I watched, or blog posts I found, were done by girls who go for a more defined, 'obvious' brow. It looked good on them, but it's just not my cup of tea. So I was worried the pigmentation of this was going to be wayyyy too much for me to handle, but I can reassure you that's not the case.
First things first, the pigmentation is strong. The first time I applied this I wiped it straight off, as I looked like a clown. But after I'd gotten a feel for it's strength and consistency, the more I used it, the better I got at it. I use my Zoeva fine liner brush and literally tickle the top of the product to build up the brush, and use a very light touch. That's all you need. A small amount on the brush and a gentle hand doing small strokes of colour, and you'll notice you're building up a really natural but 'neat' brow. And you are barely using any product. This is going to last me for flipping ages.
The technique I've found to work best is to make little "hair like" brush strokes where the brows need filling in or where you need to change the shape generally. So for example one of my brows doesn't have an even 'arch' across the top so where there's a 'dip' in the brow, I just put lots of tiny strokes of the product to bring the 'dip' in line with the rest of my arch. If I go in with a continuous line then my brows look way too fake.
I do still feel the fear with this - I know that if I get too rushed or too heavy handed, then I'm going to look ridiculous. I wouldn't apply it yet if I needed to be out the door in 5 minutes - I'd go for my trusty L'Oreal pencil, but I feel this pomade is similar to gel eyeliners. They take a bit more care, a bit more practice and skill, but the pay off is a really neat, classy-looking finish which lasts for ages.
I'm not going to go into detail about the product itself, as most blog posts out there will talk you through the consistency (creamy) and the packaging (very high end) etc. I just wanted to give my two-penneth worth on the two things that scared me the most - the pigmentation and the shade. I think the proof is in the public and when wearing it, I didn't get any sarcastic comments from my boyfriend, close friends, work colleagues etc which reassured me that I didn't look like an absolute wally.
The main thing I've found is that this product is not just for the 'obvious brow' girls out there, it can also be used to achieve a very natural brow. I've popped a photo below so you can see the finished effect, to (hopefully) show that it can look natural. It has certainly earned a permanent little place in my makeup bag.
So unfortunately my hard earned pennies have been going on furniture and cleaning products and paint and carpets and the world's cutest elephant lamps...so I've had to shelve my cosmetics obsession for a bit to stop me ending up with a seriously empty piggy bank.
But we've been moved in now for a month and I've been paid (yay) so I thought it was only right to start giving my make-up habit a bit of TLC.
The first purchase I made was something I have been um'ing and err'ing about for SO long. It's the Anastasia Dipbrow Pomade and I seriously was in two minds about whether to actually buy it.
My first issue was that I'm not much of a brow girl. At all.
I made my first foray into brows when I overplucked one eyebrow a year or so ago and my Mum lent me her brow pencil so I could do some serious repair work.
Since then I've been a strictly pencil lady, following a somewhat disappointing experience with the Smashbox brow powder (review here). Colour-wise, I swear by the Soap & Glory Archery pencil in Blonde Ambition and the L'Oreal Super Liner Brow Artist in Blonde. The L'Oreal one especially is a bar-gain at £5.49 and is such a good colour for my skin tone and hair colour. I always need a blonde which is cooler toned and a bit ashy, and that pencil is seriously my hero of the brow pencil world. So I wasn't really in the market for a new brow product.
But there are some seeeeriously good reviews out there about the Anastasia Dipbrow Pomade, and I'm a sucker for a holy grail product.
So I bought it for £15.00 + £5 postage from net-a-porter (ouuuuchie to the price). I was stuck on whether to get the "blonde" shade or the "taupe" shade and struggled to find many swatches or photos that reassured me on one or the other. I did see a few mega orange-y looking photos of the "blonde" shade so in the end I plumped (nervously) for "taupe".
And oh. man. I love this.
The "taupe" colour is definitely an ashy toned colour but it's not too grey. In fact it is a really good match for my natural eye brow colour, which I'd say is pretty mousey. I think if you're blonde, it will only work if you already have quite dark eyebrows. I've always had darker eyebrows than my hair colour, even when I had white blonde hair, so this blends in really well. If you have very fair or 'true blonde' eyebrows then it may be too dark for you. It's a very similar type of shade as L'Oreal's Brow Artist in Blonde so if you go and swatch that in a store then you can get a pretty good idea of the shade. The only difference is that the L'Oreal once is a teeny bit warmer/yellowy based whereas the taupe has a more ashy base. I've compared the brow artist and the dipbrow pomade below...
![]() |
| L'Oreal on the left, Dipbrow on the right |
And this made me nervous about the dipbrow because a lot of the youtube tutorials I watched, or blog posts I found, were done by girls who go for a more defined, 'obvious' brow. It looked good on them, but it's just not my cup of tea. So I was worried the pigmentation of this was going to be wayyyy too much for me to handle, but I can reassure you that's not the case.
First things first, the pigmentation is strong. The first time I applied this I wiped it straight off, as I looked like a clown. But after I'd gotten a feel for it's strength and consistency, the more I used it, the better I got at it. I use my Zoeva fine liner brush and literally tickle the top of the product to build up the brush, and use a very light touch. That's all you need. A small amount on the brush and a gentle hand doing small strokes of colour, and you'll notice you're building up a really natural but 'neat' brow. And you are barely using any product. This is going to last me for flipping ages.
The technique I've found to work best is to make little "hair like" brush strokes where the brows need filling in or where you need to change the shape generally. So for example one of my brows doesn't have an even 'arch' across the top so where there's a 'dip' in the brow, I just put lots of tiny strokes of the product to bring the 'dip' in line with the rest of my arch. If I go in with a continuous line then my brows look way too fake.
I do still feel the fear with this - I know that if I get too rushed or too heavy handed, then I'm going to look ridiculous. I wouldn't apply it yet if I needed to be out the door in 5 minutes - I'd go for my trusty L'Oreal pencil, but I feel this pomade is similar to gel eyeliners. They take a bit more care, a bit more practice and skill, but the pay off is a really neat, classy-looking finish which lasts for ages.
I'm not going to go into detail about the product itself, as most blog posts out there will talk you through the consistency (creamy) and the packaging (very high end) etc. I just wanted to give my two-penneth worth on the two things that scared me the most - the pigmentation and the shade. I think the proof is in the public and when wearing it, I didn't get any sarcastic comments from my boyfriend, close friends, work colleagues etc which reassured me that I didn't look like an absolute wally.
The main thing I've found is that this product is not just for the 'obvious brow' girls out there, it can also be used to achieve a very natural brow. I've popped a photo below so you can see the finished effect, to (hopefully) show that it can look natural. It has certainly earned a permanent little place in my makeup bag.
Sunday, 28 September 2014
Benefit They're Real mascara - A review
If you've read my blog posts before you'll know that when it comes to make-up, mascara is my holy grail product. My eyes are small, and my eyelashes are stubby, and without mascara I pretty much look like a little mole who has just seen sunlight for the first time.
I've dabbled with other mascaras in the past, but I have a firm old faithful in Maxfactor's 2000 Calorie. I love that mascara ... nothing volumises and lengthens my little stubbies like the 2000 Calorie, and because of this, I can be pretty dismissive of most other mascaras on the market. If people recommend products to me, I'm out there in Boots before I've even reached the bottom of the blog post, but with mascara it just doesn't happen.
I've seen a LOT of stuff on the internet about Benefit's You're Real mascara. It has got some impressive rave reviews from heavyweight bloggers, but the £19.50 price tag has always put me off. My 2000 Calorie is £6.99, so in my head I'm thinking I don't want to get attached to something more than twice the price. Ignorance can sometimes be bliss with these mega expensive products.
But then a girl I work with started using it, and she is a bit of a mascara junkie too. And then she bought a mini sample in for me....and it was all over.
When I first pulled the mascara wand out, I was like "oh hi plastic comb type brush, I can tell we are not going to get on already". I have a bit of a hatred for plastic comb type brushes as I just never find them volumising, and I never think they load my lashes as much as I want. But as I started using it, I couldn't deny that this little plastic comb wand was GOOD. It didn't take too long to build up a decent coverage, but the thing I loved about this was that it somehow managed to volumise but keep my lashes nicely separated. The result was that my lashes looked really "pretty" and fluttery. It was a lash effect that, I'll be honest, I'd never managed to achieve before. They were thick and black but still delicate.
Soooo a full size purchase was made and I happily parted with my £19.50 safe in the knowledge I was now going to be a fluttery eyelash girl.
But a fluttery eyelash girl I am not. I can hands down say that this mascara turned out to be SUCH a disappointment. I am not quite sure what happened - whether the sample was a slightly different formula (unlikely) or whether the larger mascara dried out quicker - but either way, this mascara went on SO badly.
It is so hit and miss! I start applying it and I'm starting to get my fluttery lashes and then bam! I have three eyelashes left. You know the effect I mean, where the mascara sticks all your lashes together and however much you wiggle that damn wand and try and separate them out, you're left with just three spikey lashes. It's how my lashes go if I cry with mascara on and I hate it. The first time this happened I was thinking maybe I went in too heavy handed. The second time it happened I thought maybe I still had to practice my application a bit. But this literally happens 95% of the time that I use this mascara. I do get right into the root of the lashline and wiggle wiggle wiggle with my wand, but those damn lashes wont separate out. It also dries quite quick and once it is dry it goes so rigid that you cannot go in with any more coats. Once it is dry it's all over. I'm pretty sure that die hard fans of this mascara will be muttering away about bad application, and yes, it could very well be that. But I'm not a rich little lady, and I can't keep whacking out £19.50 to practice with a mascara that just ain't doing it for me.
The tricky thing is, if you're reading this and trying to decide whether to buy it, I'd have to say you need to buy one and give it a go, because products like these don't get cult followings for nothing. But if you try it and you end up with three crispy lashes then you're not alone, you can join my club (and maybe go out and buy the 2000 calorie!).
All about eyeliner
Then I purchased a magazine...aaaand it came with a free Eyeko skinny liquid eyeliner. I didn't buy the magazine for the eyeliner and I didn't really have any intention of using it, but that little cosmetics freak inside me couldn't help but have a little intrigued "ooo what's this".
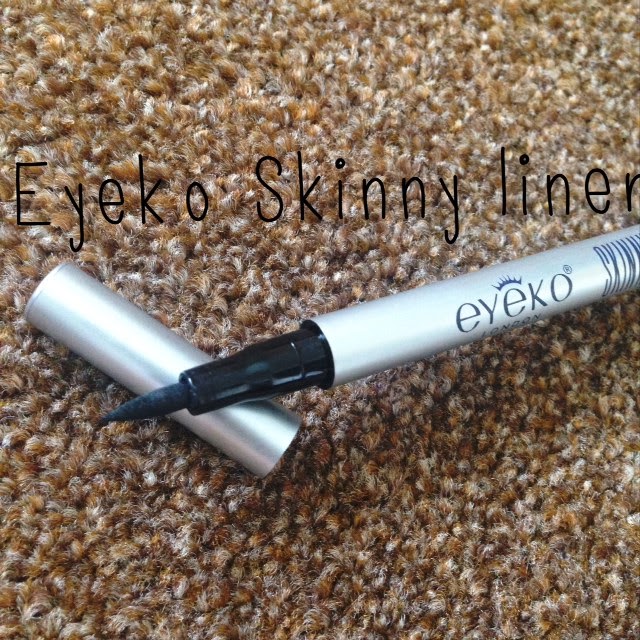
So, here is the Eyeko Skinny liner photographed above and you can see it is (dum dum dummmm) a felt tip pen. Traditionally, I've been a massive snob towards pen eyeliners. I think they dry out wayyyy too quickly, and I used to use one back in sixth form before I (after years of practice) mastered a gel eyeliner. In my head they were something you used if you hadn't yet graduated to the world of gel eyeliner. and I had.
First things first, I just want to say that I wasn't impressed with the Eyeko liner. I'd have ben gutted if I had actually spent money on it, and safe to say it's currently mooching around somewhere at the bottom of my make up box, probably never to be seen again.
But it was the ease of application that took me by surprise. The nib was tapered to a very thin point and had a good mix between sturdy and flexible, meaning I could get right into my lash line and achieve a good even thin line.
The second thing I loved about this was how fuss-free it was. The lazy little hobbit inside me absolutely loved that there was no brush cleaning needed. I hate cleaning my eyeliner brushes. I'm always in a rush and there's that annoying point where you're like "damnit I need to clean it so the bristles don't splay, but wow I can't be bothered." The pen had none of this. It had a lid, and lids I can do.
Downsides of this eyeliner though, in my opinion, was the major problem that this dried out...constantly. My first eye would be all strong, black, inky line and then my second eye would literally be like "hello?" You know when you were a kid and your felt tip pens ran out and went all faded before you'd finished colouring in your picture? Well this is what this eyeliner was like. Every. Time. The next day when I'd come back to it, the 'ink' (I call it ink, I mean the eyeliner) was flowing fine again, but one eye down and we're back to a pathetic faded line. Not good. I'm not sure if it's because mine was a free sample, but either way, I thought this was bad.
But nevertheless, it peaked my interest and less than a few days later and oh hello!
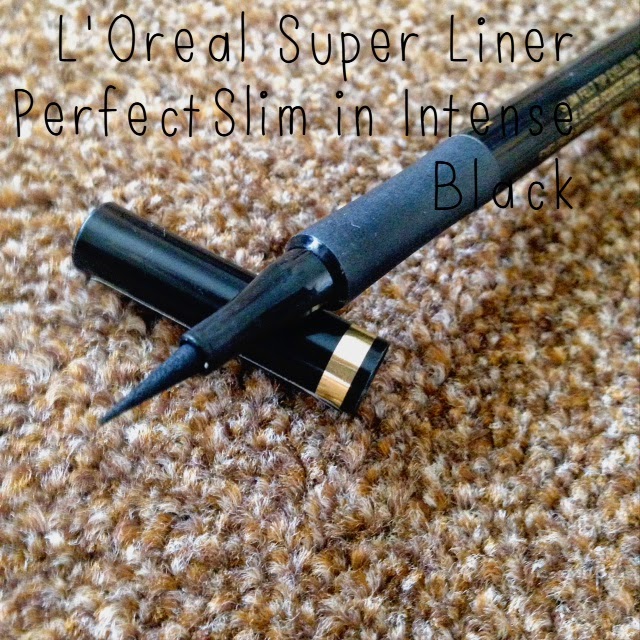
Enter into my life, the L'Oreal Super Liner Perfect Slim. I'd seen this given glowing reviews by Youtube make-up gurus such as Tanya Burr, so I thought I'd give it a punt. At £5.99 it wasn't a bank breaker.
And oh my, I can now stand up and proudly say I am a felt tip eyeliner convert. This liquid eyeliner is so good. You can see (sort of) from the photo that the nib is quite long, tapered to a very fine point and I can confirm it is the perfect mix of sturdy and flexible.
I find this such a breeze to apply. The nib gets right into the lash line and gives such a fine line that you can do a really subtle eyeliner effect that I haven't really ever managed with the gel eyeliner. Yes, this does do that annoying pen eyeliner thing, where it spits out tiny 'branches' sometimes where you have eye wrinkles or creases, but its massively improved on the old pen eyeliners I used to use and it's barely noticeable.
The intensity of the colour is awesome, and this pen hasn't dried out on me once. It's still going strong and I bought it over a month ago. You don't get any of that frustrating brush splaying that you get with gel eyeliner, and no cleaning!! Hoorah!
I recently introduced by Mum to liquid eyeliner and she started off with the gel eyeliner and found it so difficult to control. I bought her one of these and she loves it, so I'd definitely recommend this product to both the seasoned professional and to the beginners out there. I don't think it will stop me using gel eyeliner as sometimes you just need that gel effect, but it's definitely a fantastic alternative and so much quicker and easier. If you're a gel convert I'd implore you to give it a go, you may surprise yourself.
Subscribe to:
Posts (Atom)


.jpg)